
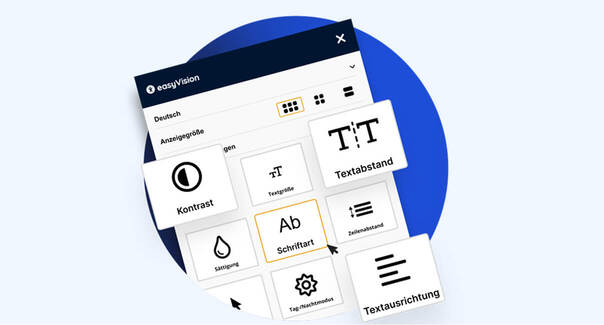
Setting up the easyVision Widget – Get Started the Right Way
A step-by-step guide to successfully integrating the easyVision Widget into your website.

With easyMonitoring, SiteCockpit provides a powerful tool to regularly check your website’s accessibility. In this article, we explain how the scan works, how to add pages to monitoring, and what the accessibility score means.
To activate monitoring, go to the "Monitoring" section in the SiteCockpit backend. There, select your desired domain. Once the domain is verified, you can add your pages to the scan.
Click the "Fetch URLs" button to load all available pages. Then simply check the boxes for the pages you want to monitor.
After selecting your pages, you can start the scan manually at any time by clicking "Scan Now". The system will automatically analyze the chosen pages against current accessibility standards.
Scan duration depends on the number and size of pages. You will be notified once the process is complete.
Each scanned page receives an accessibility score between 0 and 100. A high score means the page is highly accessible. A low score indicates room for improvement.
Note: The score reflects technical and structural criteria. A score of 100 means fully accessible, while 0 means entirely inaccessible.
Our monitoring feature helps you keep track of your website’s accessibility. If you have questions about specific results or interpretation, our support team is here to help.
Together, we ensure your pages are not only legally compliant but truly accessible to everyone.
Practical guides, legal insights, and concrete solutions for implementing accessibility with SiteCockpit.
A step-by-step guide to successfully integrating the easyVision Widget into your website.
The BFSG mandates accessibility for companies—what you specifically need to do to stay compliant.
How to efficiently and securely organize team access with the built-in user management.
From theory to practice: how to systematically meet WCAG guidelines with SiteCockpit.